The Boxster Aspheric Mirror Page
This page describes the aspheric (wide angle) mirrors for the Porsche
Boxster. They are an easy plug-in replacement (directions
below) for the standard U.S. mirrors.
Why would I want them?
Because they cover a wider angle than the standard U.S. mirrors.
Here are some photos showing the angles covered. (See below for details
of how they were taken.)
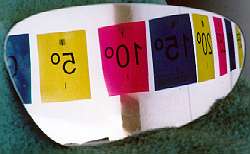
| Standard U.S. Mirrors: |
|

|
|
| The
driver's side mirror covers an angle of about 18º, with a normal perspective
allowing accurate judging of distance. |
The passenger's
side mirror covers about 25º, and objects in mirror are, to coin a
phrase, closer than they appear. |
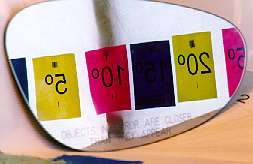
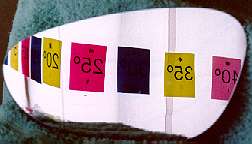
| Aspheric Mirrors: |
|
|
|
| The
mirrors are identical in coverage, but because the driver is closer to
the driver's mirror, it covers an angle of about 42º while the passenger
mirror covers about 38º. Distance is difficult to judge; objects
seem even further away in the driver's side aspheric mirror than they do
in the standard passenger side mirror. |
How do they do that?
By using different degrees of convexity. 80% of the aspheric
mirror is a convex wide-angle surface similar to the U.S. passenger side
mirror. The outside 20% of the mirror is super wide-angle, getting
progressively more convex toward the outside edge. You can see objects
in this part of the mirror, but they are scrunched horizontally, so much
so that at the edge of the mirror they are hard to identify. But
you can see whether something is there or not.
Why would I not want them?
Because it is even harder to gauge distance in these mirrors than in
the standard wide-angle U.S. passenger-side mirror. This is mostly
of concern with the driver's side mirror. Some people have gotten
used to them. Some people have reported near-accidents with them.
How can I get them?
The Porsche part numbers are 996 731 035 02 for the driver's mirror,
and 996 731 036 02 for the passenger side mirror. As far as I know
they are not sold in the U.S. They can be ordered from Chris
Kramer in Germany.
How can I find out more about them?
Don't ask me - everything I know is on this page. You can email
Chris, or post your questions on Porsche
Pete's Boxster Board.
How do these mirrors install?
Here's the step by step demonstration given at BoxsterFest
II by Randy Russell.
Randy organizes the 'Fests, and also has placed some pool orders for items
from Chris Kramer in order to share the shipping charges from Germany.
Randy insisted that we find a better looking pair of hands than his, so
Boxsterwaiter Leslie Wallace volunteered.
| 1. Using the
electric mirror control, tilt the mirror as far down and toward the vehicle
as it will go. |
 |
|
|
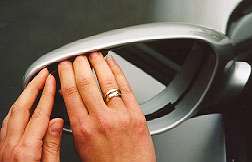
2. Work a finger or two
behind the upper outside corner of the mirror and start to pry it out.
As you can see from the next two pictures below, there's a large mounting
ring in the center, so try to work your fingers behind the mirror and closer
to the ring as you pull out. It takes a fair amount of force but
the mirror is sturdier than it looks. |
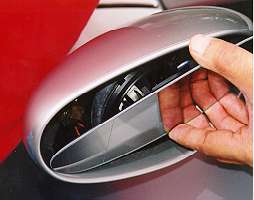
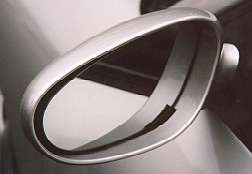
3.
As you work your fingers behind the mirror and continue to apply force,
the mirror will suddenly snap out with a terrifying pop. Catch it
and calm yourself.
The mirror
is still attached by two brown wires for the heating element. If
you're nervous about polarity, now's the time to make note of which wire
goes where - though they're not color coded and with a heating element
it shouldn't matter.
Grasp one connector
- not the wire - and wiggle it back and forth until the connector comes
loose. Then remove the other one. Be sure to wiggle in the
direction of the prong attached to the mirror - don't bend the prong.
These connectors can be pretty tight so this may take some time and tugging. |
 |
|
|
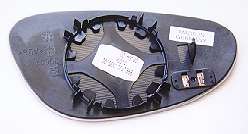
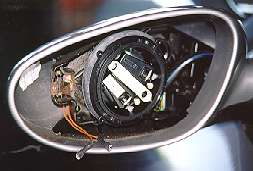
4. Here's a better look
at the back of the mirror. Note the big mounting ring in the center,
the lugs for the heater at the lower right, and the locator finger directly
above the lugs. |
| 5. Plug the brown wires
onto the heater lugs on the mirror. |
 |
|
|
6. Look at the photo above,
and note the bronze-colored locator strips just above the brown wires.
Guide the locator finger on the back of the mirror between the locator
strips. Then press the mirror into place, pushing on the face
of the mirror in the middle, where the mounting ring is. Push until
you hear the mirror snap into place. Press firmly to make sure it
is seated. Hey, isn't that Randy's hand in the photo? |
So how did you take those neat pictures of the
mirrors?

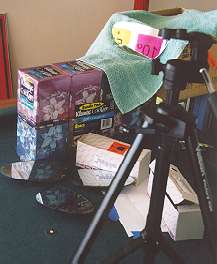 I'm
glad you asked. A set of targets (left) were printed on different
colored sheets of paper, to allow them to be distinguished even in the
squeezed portions of the aspheric mirrors. A base for the mirrors
was constructed out of common household objects (right). A Meguiar's
Unigrit Sanding Block (hidden under the towel) was the perfect size for
propping up the narrow side of the mirror to get it more or less level.
I'm
glad you asked. A set of targets (left) were printed on different
colored sheets of paper, to allow them to be distinguished even in the
squeezed portions of the aspheric mirrors. A base for the mirrors
was constructed out of common household objects (right). A Meguiar's
Unigrit Sanding Block (hidden under the towel) was the perfect size for
propping up the narrow side of the mirror to get it more or less level.
The camera was placed to give a lens to mirror distance about equal
to that measured in the Boxster: 24" for the driver's side mirrors and
44" for the passenger side. Because the wall was flat, the distance
to the angle marker targets varied from 8 to 10 feet, which is why the
targets are different distances apart.
The aspheric mirror does not focus uniformly across its width.
The eye copes pretty well with this; on the car you pretty much have to
look for the effect to see it. But it sure shows up when taking photos!
The effect was minimized in the above photos by using a tiny aperture setting
on the camera.